03 - Deploy Azure Container Instances (10 min)
In this walkthrough we create, configure, and deploy a container by using Azure Container Instances (ACI) in the Azure Portal. The container is a Welcome to ACI web application that displays a static HTML page.
Task 1: Create a container instance
In this task, we will create a new container instance for the web application.
-
Sign in to the Azure portal.
-
From the All services blade, search for and select Container instances and then click + Add, + Create, + New.
-
Provide the following Basic details for the new container instance (leave the defaults for everything else)):
Setting Value Subscription Use default supplied Resource group Create new resource group Container name mycontainer Region (US) East US Image source Docker Hub or other registry Image type Public Image microsoft/aci-helloworld OS type Linux Size Leave at the default -
Configure the Networking tab (replace xxxxx with letters and digits such that the name is globally unique). Leave all other settings at their default values.
Setting Value DNS name label mycontainerdnsxxxxx Note: Your container will be publicly reachable at dns-name-label.region.azurecontainer.io. If you receive a DNS name label not available error message following the deployment, specify a different DNS name label (replacing the xxxxx) and re-deploy.
-
Click Review and Create to start the automatic validation process.
-
Click Create to create the container instance.
-
Monitor the deployment page and the Notifications page.
Task 2: Verify deployment of the container instance
In this task, we verify that the container instance is running by ensuring that the welcome page displays.
-
After the deployment is complete, click the Go to resource link the deployment blade or the link to the resource in the Notification area.
-
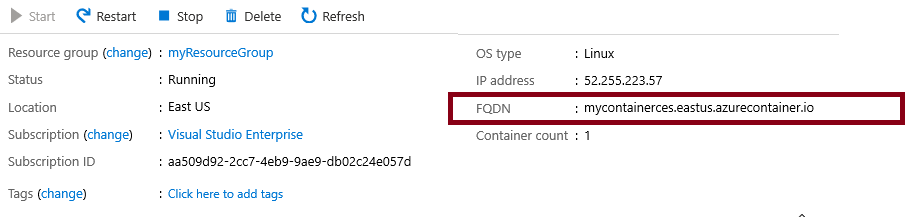
On the Overview blade of mycontainer, ensure your container Status is Running.
-
Locate the Fully Qualified Domain Name (FQDN).
-
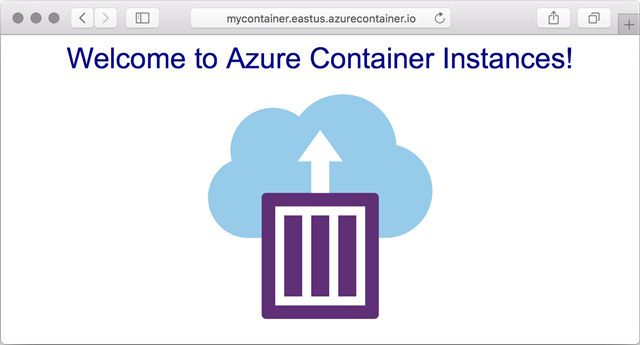
Copy the container’s FQDN into a new web browser tab and press Enter. The Welcome page should display.
Congratulations! You have used Azure Portal to successfully deploy an application to a container in Azure Container Instances.
Note: To avoid additional costs, you can remove this resource group. Search for resource groups, click your resource group, and then click Delete resource group. Verify the name of the resource group and then click Delete. Monitor the Notifications to see how the delete is proceeding.